Hi, welcome to funnelmoose.com and my illustrated step by step guide of how to integrate GetResponse with ClickFunnels.
GetResponse is a great choice of tool for your ClickFunnels email autoresponder integration. In fact, I think Get Response responder is the best autoresponder for ClickFunnels.
In this article, you will learn:
- How to connect Click Funnels with GetResponse via an API Key
- A solution that actually works for the connection issue between these two platforms when trying to connect via an API key
- How to connect ClickFunnels and GetResponse using an HTML form integration
- How to add a mailing list in GetResponse to your sales funnel landing pages
By the end of this article, you will be able to link ClickFunnels with GetResponse and collect those all-important email addresses from your ClickFunnels landing pages and add them to your email marketing automation lists.
There are two methods you can use to link ClickFunnels with GetResponse:
- ClickFunnels API key integration
- ClickFunnels HTML form
I will of course cover both methods for you.
Table of Contents
What Do You Need?
Before we start you’ll need three things to do this:
- ClickFunnels account.
- GetResponse account.
- An email list in your GetResponse account.


If you’ve got your accounts and your GetResponse email list sorted, let’s get to it.
How To Integrate GetResponse With ClickFunnels Via API Key
Step 1
You need to contact GetResponse and have them revert your account API to API V2.
Why? The API GetResponse is now operating on is API V3, whereas ClickFunnels API is still API V2. The two will NOT work together.
If you skip this step, you will see ClickFunnels failed to connect to GetResponse error warning:

This is very straight forward and can be done over the Live Chat support. It should take no more than 2 minutes to complete.
See this article for more information: ClickFunnels Won’t Connect To GetResponse? PROBLEM SOLVED!
Once you’ve got your GetResponse API reverted to API V2, you can carry on with the rest of this guide.
Step 2
You now need to get your API Key from GetResponse.
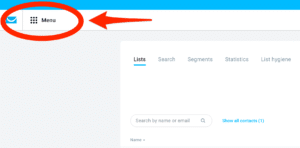
Go to the GetResponse login page, sign in to your account, and click on Menu in the top left corner:
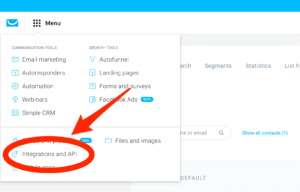
Click on Integrations and API:
Step 3
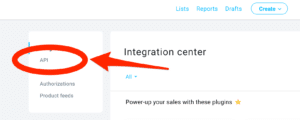
Click on API within the Integrations Center:
Then click Generate API Key: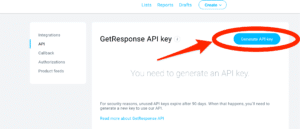
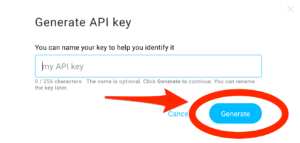
Step 4
You may name your API Key at this point. It may be helpful to do so if you’re integrating GetResponse with more than one platform.
Click on Generate:
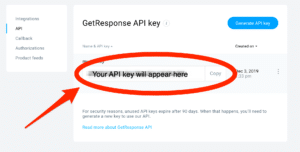
Your API key has now been generated.
Click on Copy:
Now you’ve generated your API Key, the next step is to enter this into your ClickFunnels account.
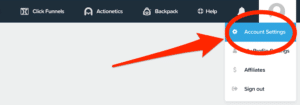
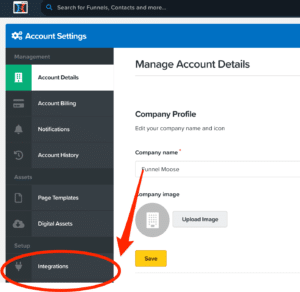
Step 5
Go to the ClickFunnels login page, sign in to your account and click on Account Settings:
Step 6
Click on Integrations:
Step 7
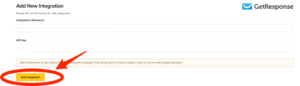
Click on Add New Integration: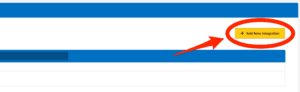
Step 8
Click on GetResponse which should be on the right-hand side of the top row of integration options.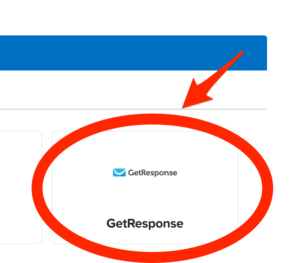
Step 9
Enter a nickname for your integration.
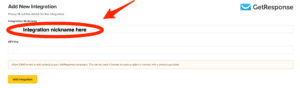
Enter your API key from GetResponse.
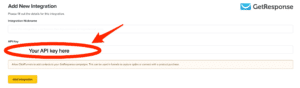
Click Add Integration:
You have just completed the ClickFunnels GetResponse integration.
If you don’t want to run an outdated version of API on GetResponse, which is understandable as there’s a good reason software gets updated, you can still integrate GetResponse with ClickFunnels using HTML forms.
How To Integrate ClickFunnels With GetResponse Via HTML Form
Setting up the GetResponse ClickFunnels integration using an HTML form integration is slightly more complicated and you’re only permitted one ClickFunnels HTML form integration in your account.
The first thing you’ll need to do is get the HTML optin code from GetResponse.
Step 1
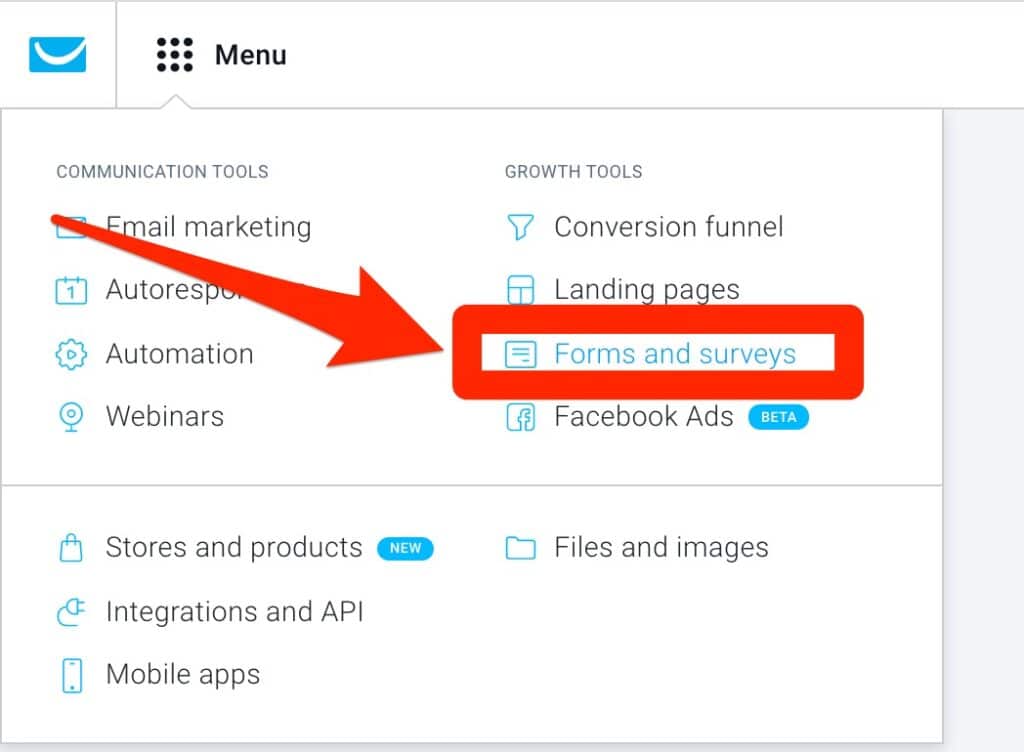
Log in to your GetResponse account and click on Menu in the top left:

Click on Forms & Surveys:
Step 2
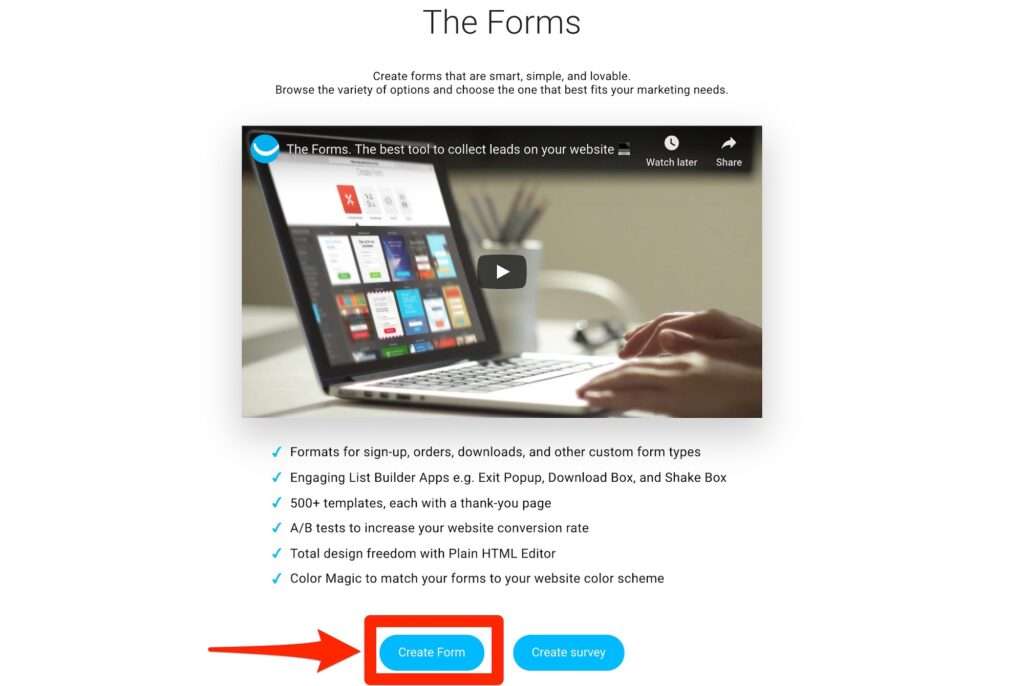
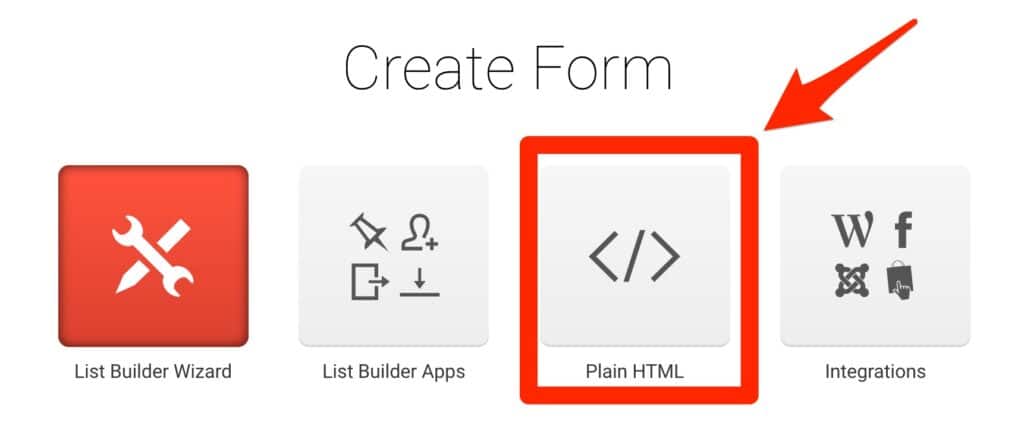
Click on Create Form:
Step 3
Click on Plain HTML:
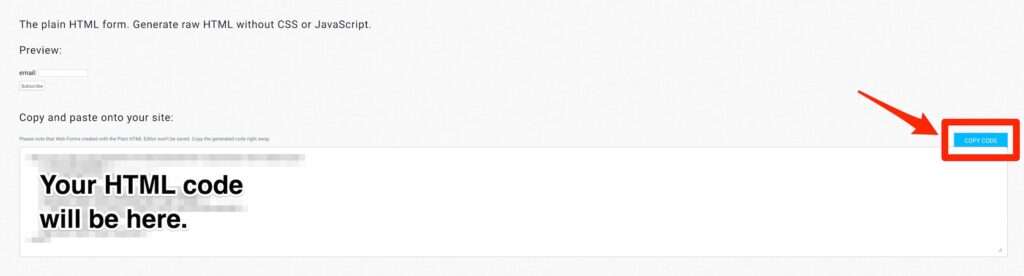
Step 4
Now you’ve generated your GetResponse HTML code, click the blue Copy Code tab on the right:
Step 5
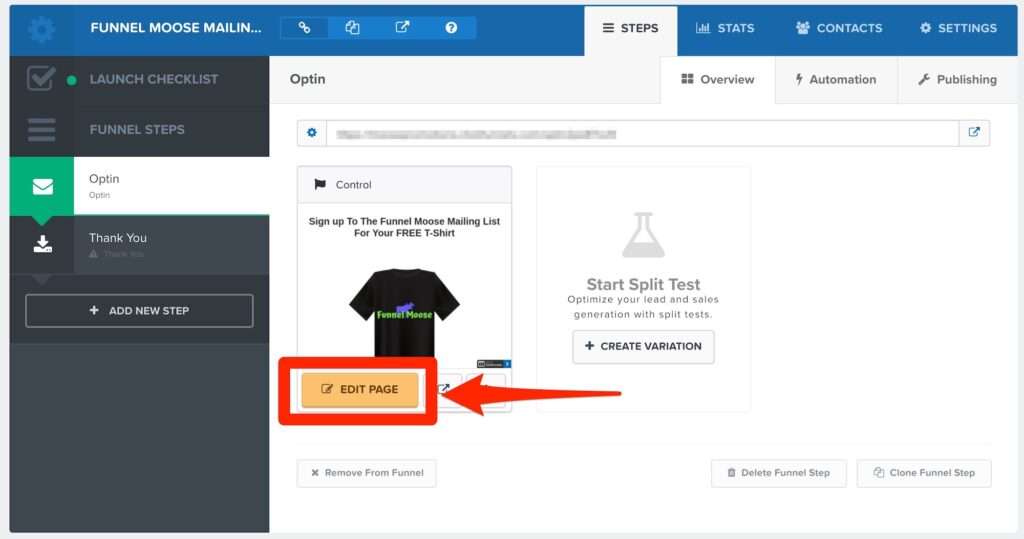
Open your funnel within ClickFunnels and select the page where you have the email address collection box. This is usually on the optin page.
Click on Edit Page:
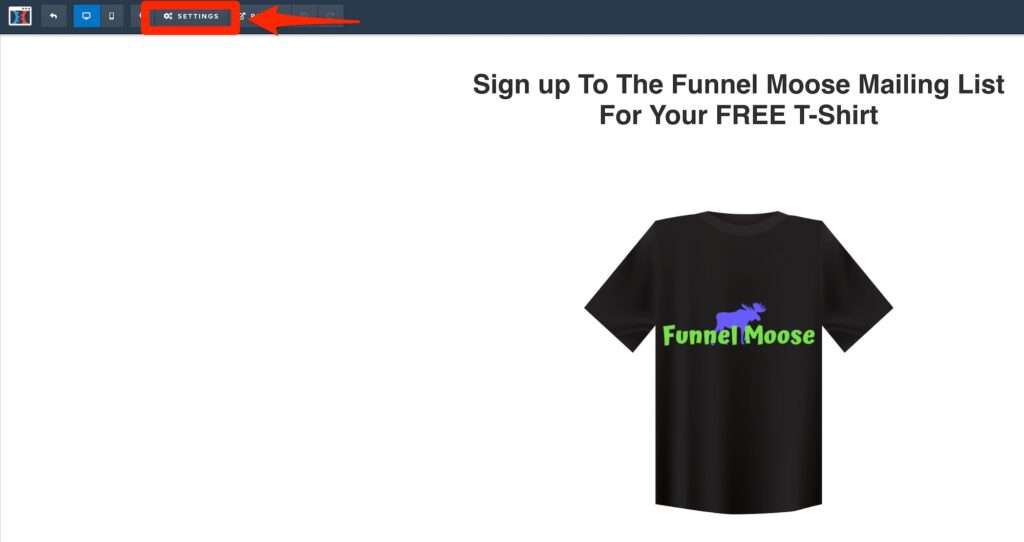
Step 6
Place your mouse cursor over Settings:
Then click on Integrations:
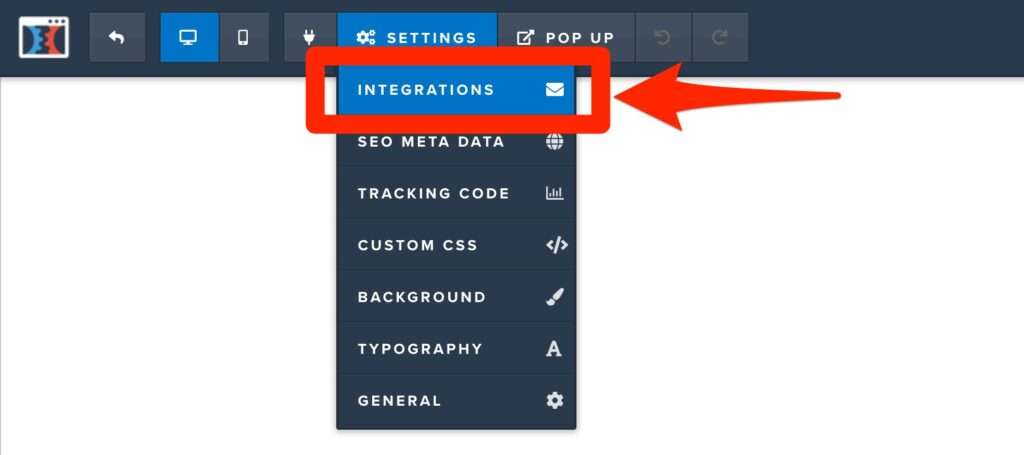
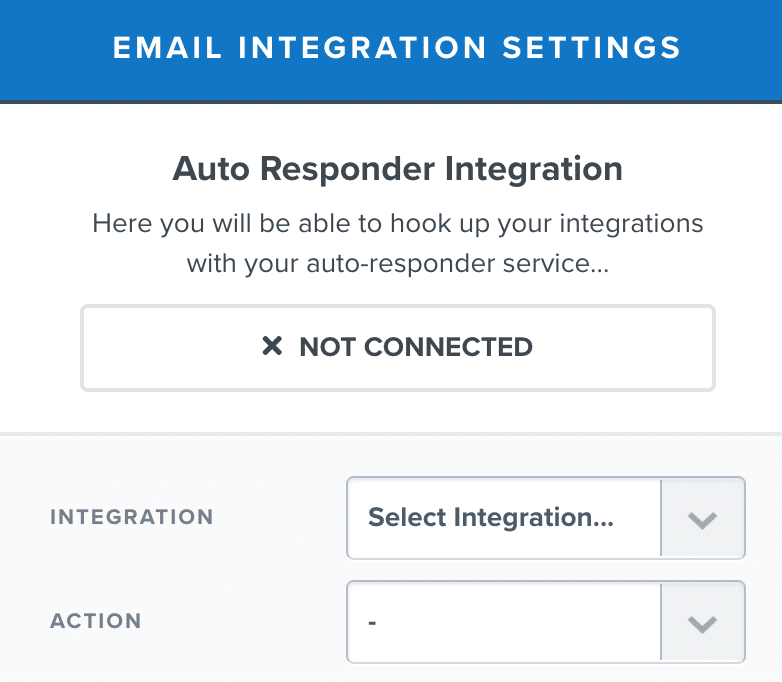
Step 7
The following menu will appear on the right of your screen.
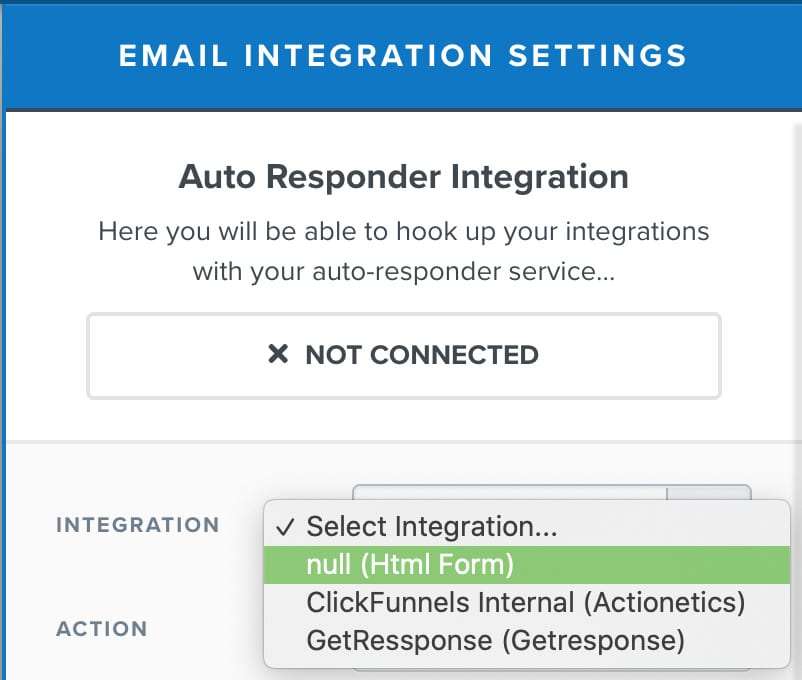
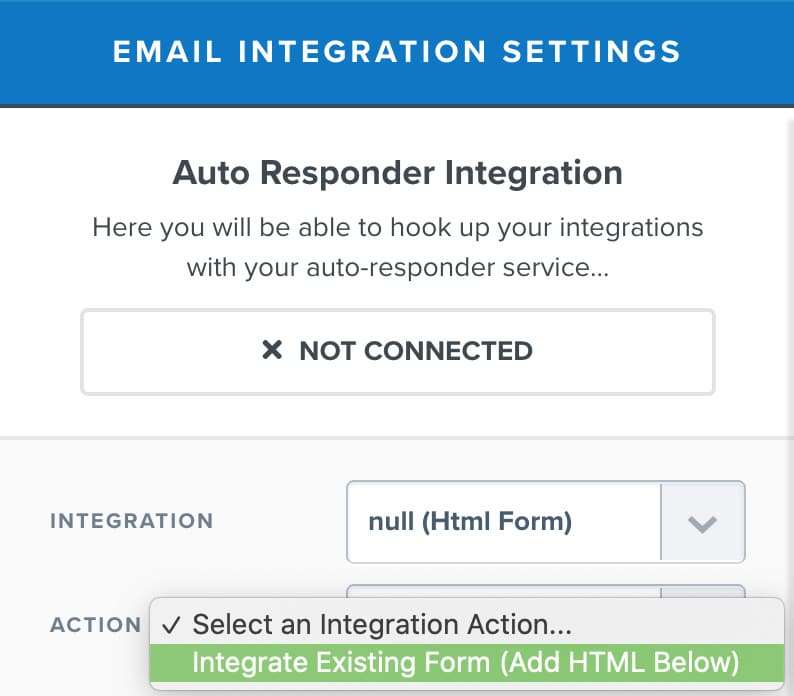
Click on the down arrow next to Integration:
Then click on the null (Html Form):
Step 8
Click the down arrow next to Action:
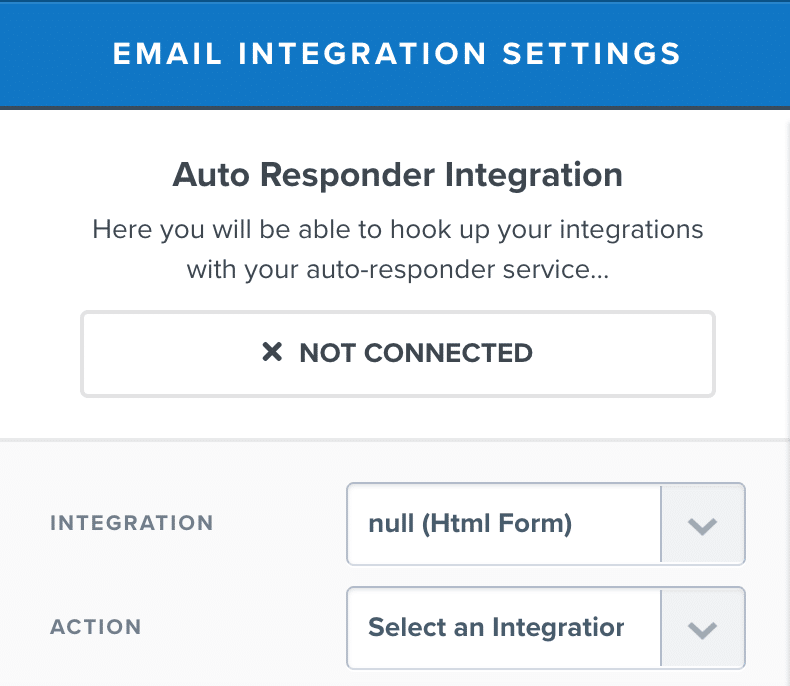
Then click on Integrate Existing Form (Add HTML Below):
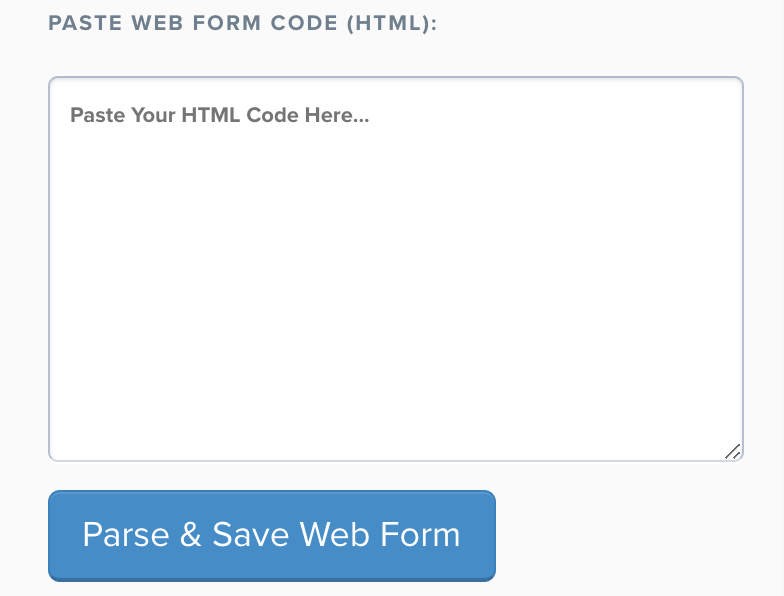
Step 9
Paste your GetResponse HTML code in the box:
When using paste in ClickFunnels, I recommend you use your keyboard shortcut instead of the right-click option with your mouse, which can add a space on to the end of your text and cause an error.
The paste keyboard shortcuts are:
- ctrl + v on Windows.
- cmd + v on Mac.
Then click on Parse & Save Web Form.
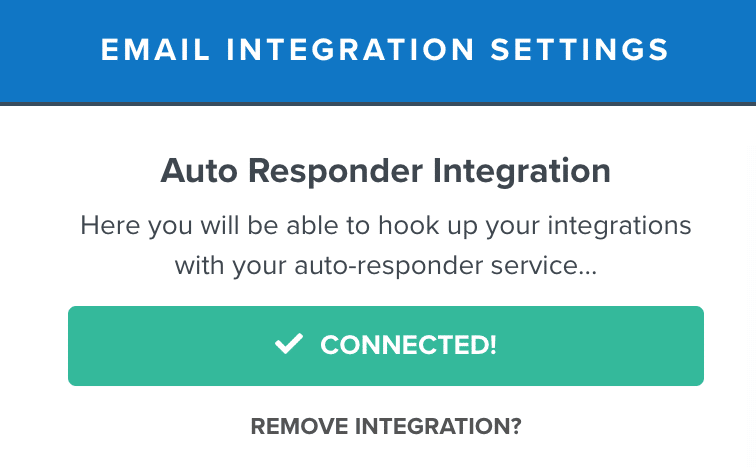
You will now see your integration has connected:
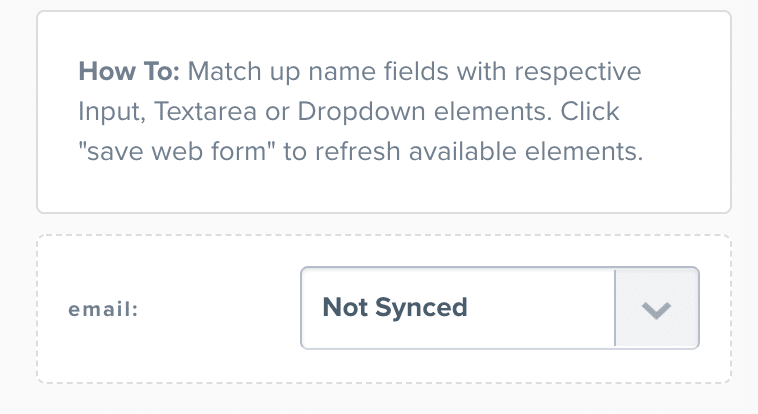
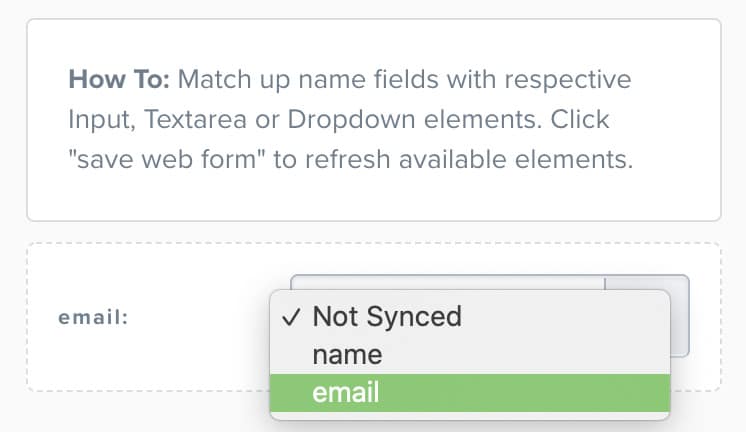
Step 10
Match up the field forms in accordance with what you have on your funnel page:
Step 11
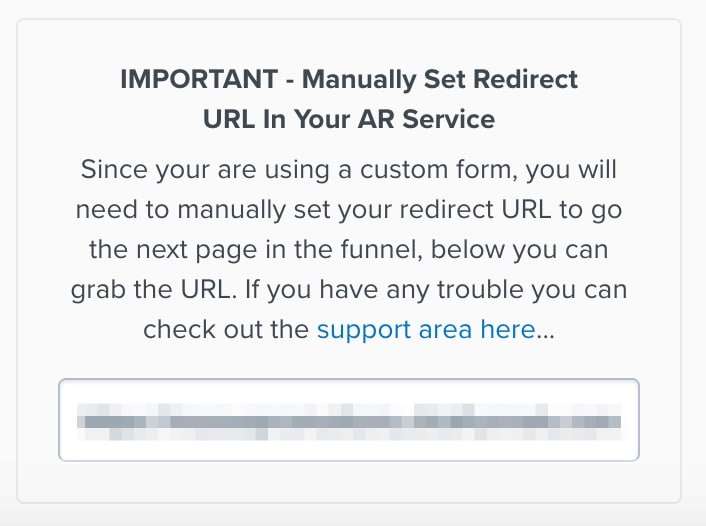
Set the URL you wish to have your lead go to next. By default, the next page of your funnel will automatically be set:
Step 12
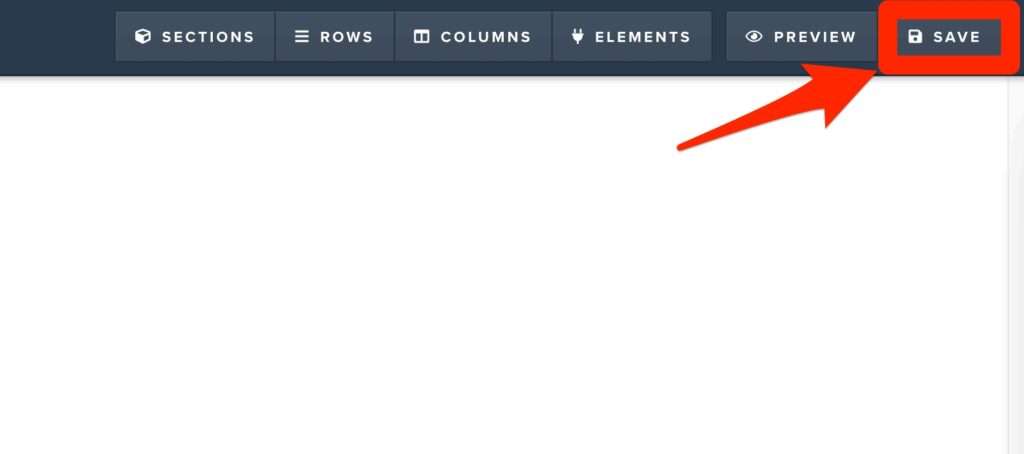
Click anywhere to the left-hand side of the tab that’s open, then click on Save in the top right corner:
That’s the process complete.
You have now just connected ClickFunnels to GetResponse via HTML Form.
Three things to bear in mind here:
- You must use Plain HTML. Javascript HTML is not allowed.
- You’re only allowed One HTML integration within ClickFunnels.
- HTML Forms don’t work on order pages.
Now you’ve connected your GetResponse and ClickFunnels accounts, you need to add a mailing list from GetResponse to your sales funnel so you can start to collect people’s email addresses.
Link Your Email List To Your Funnel
The last step is to link your email list to your funnel.
You will need two things for this step:
- A list in GetResponse.
- An email collection box in your sales funnel.
I’m assuming you already have these in place already.
I have the following step by step guide: How To Create An Email List In GetResponse should you need it.
Step 1
Open your funnel within ClickFunnels and select the page where you will collect email addresses from.
This is usually the opt-in page:
Step 2
Click Edit Page:
Step 3
Place your mouse cursor on Settings in the top left:
Step 4
Click on Integrations:
This window should now have opened on the right-hand side:
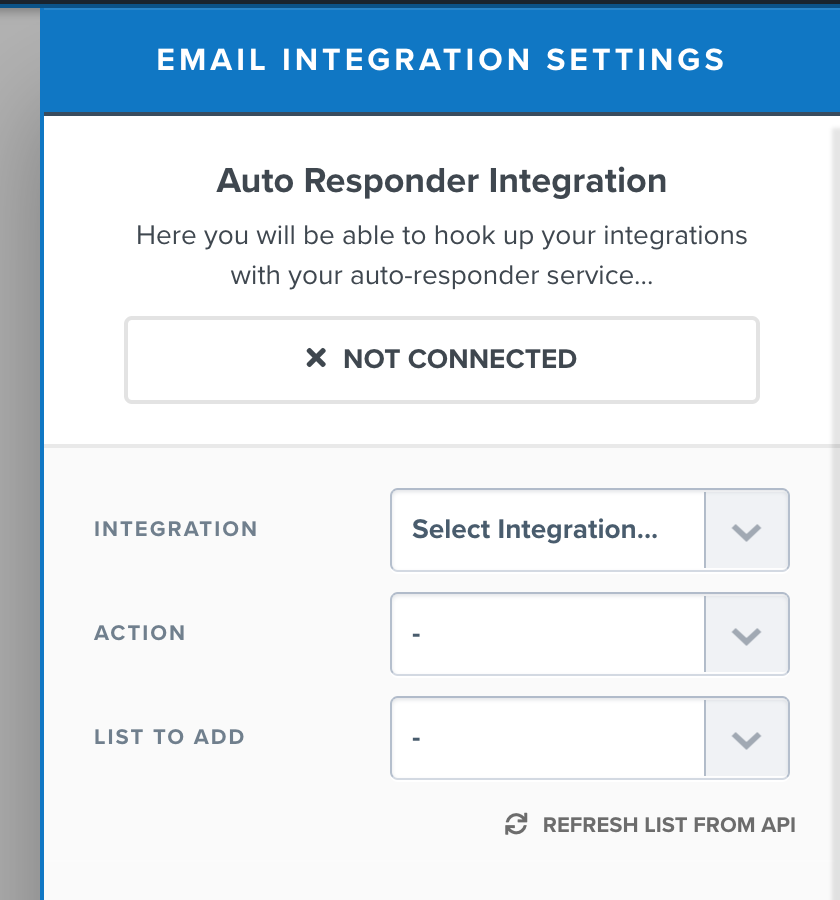
Step 5
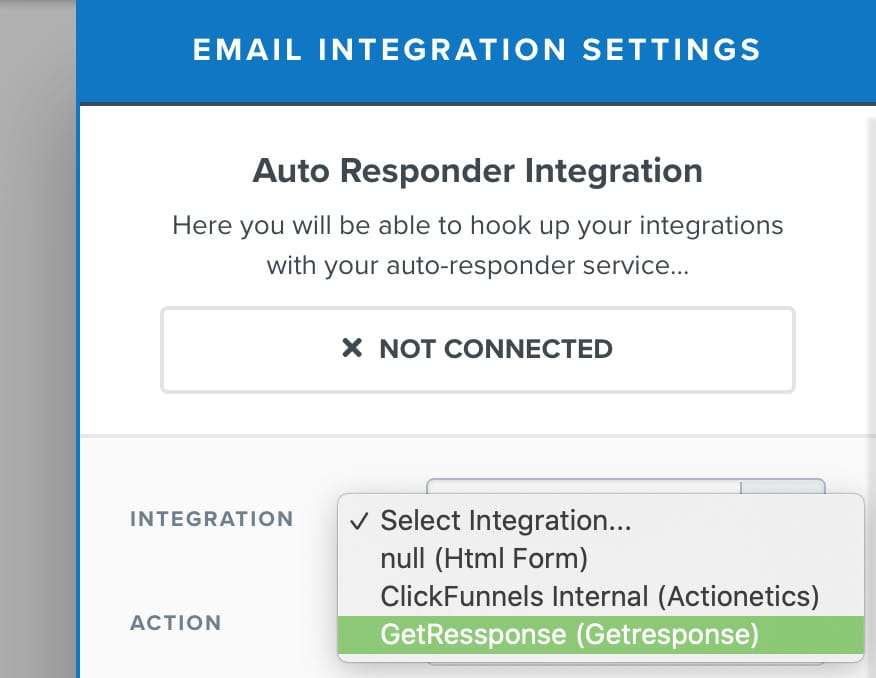
Click the down arrow next to Select Integration, then click on GetResponse:
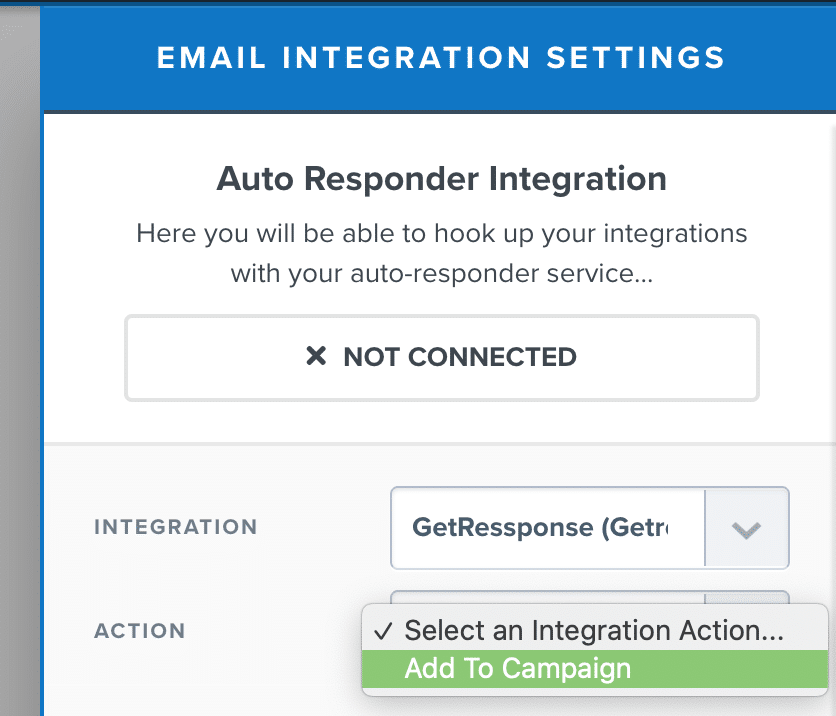
Step 6
Click the down arrow next to Action, then click on Add To Campaign:
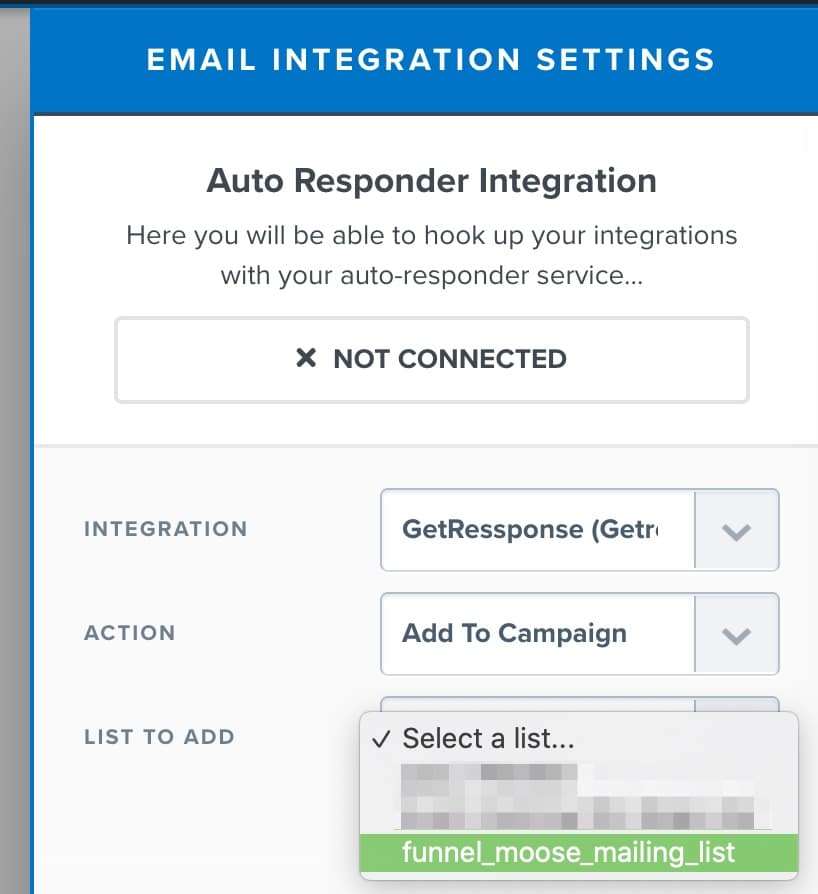
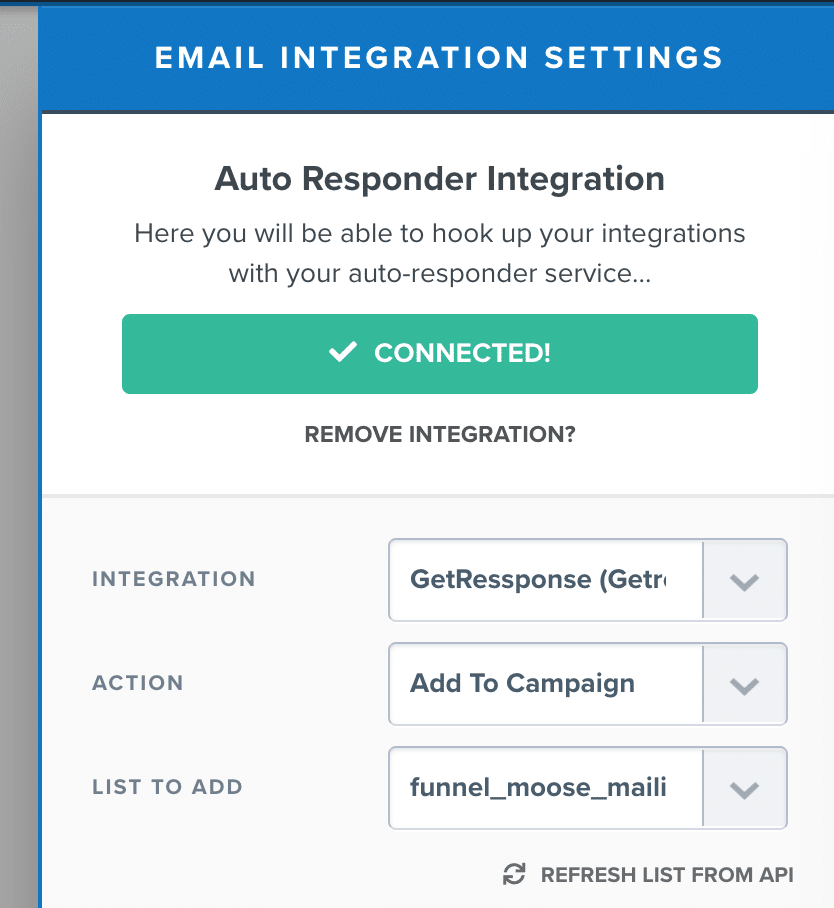
Step 7
Click the down arrow next to List To Add, then choose the mailing list you want to use:
You will then see the Auto Responder Integration at the top look like this:
Click anywhere on your screen to the left of this tab to close it.
Step 8
In the top right of your screen, click on Save:
You have now fully integrated GetResponse with ClickFunnels and can collect email addresses from the optin page of your sales funnels.
Thank you for taking the time to read my article on how to integrate GetResponse with ClickFunnels, I hope you found it helpful.
Further GetResponse Integrations
For a complete GetResponse integration list, please see this article: Complete List Of GetResponse Integrations
If you’d like more GetResponse help, I have many articles on my blog including:
How To Integrate PayPal With GetResponse
Integrate Stripe With GetResponse: The Best Payment Platform
How To Create An Email List In GetResponse
GetResponse Delete Inactive Contacts
How To Get Your API Key From GetResponse
Further ClickFunnels Help
For a complete ClickFunnels integration list, please see this article: Complete List Of ClickFunnels Integrations
If you’d like more how to integrate autoresponder with ClickFunnels instructions, I have the following articles:
How To Integrate ActiveCampaign With ClickFunnels
How To Integrate AWeber With ClickFunnels
How To Integrate Constant Contact With ClickFunnels
How To Integrate ConvertKit With ClickFunnels
How To Integrate MailChimp With ClickFunnels
Disclaimer: I am an independent ClickFunnels & GetResponse Affiliate, not an employee. All views expressed on this blog are my own based on my own experience of using the ClickFunnels & GetResponse software. I use affiliate links on my blog and may earn a commission from any links you click on and make a purchase.